
Hello, internet surfer!! Welcome to my Windows tutorial on how to rip CDs to get the mp3 files from them, and how to burn CDs using existing mp3 files you already have. There are multiple methods of doing this, but I use the program "MusicBee" to do all of it. You can download MusicBee for Windows 7, 10, or 11 on their website: getmusicbee.com.
PREFACE: What are CDs, and how does CD burning work?
Let's start with the basics. A CD (Compact Disc) is a thin disc of metal and plastic with three layers. The top layer is a layer of plastic and lacquer, the middle layer in-between is reflective aluminum, and the bottom layer is a protective layer of polycarbonate. A CD can store a variety of file types, but audio CDs primarily use MP3 and Wave files. CDs store their file information in Binary, or ones and zeroes.
CDs that are manufactured for you are made off of one Master disc. This original disc is burned by a laser beam that etches little bumps (called "pits") into the surface of the disc. A bump on the disc represents a 0. A flat spot represents a 1. Yay, binary!! This Master disc holds all of its information in a very small and tight ongoing spiral of pits. Every CD has around 16 millon pits. After the Master CD is done, it's copied thousands upon thousands of times by being pressed into a new, blank piece of plastic that is then coated with an aluminum layer, polycarbonate and lacquer, and covered with the label.
A CD player works by using a laser (a semiconductor diode laser), an electronic light detector (a really small photoelectric cell), and an electric motor. The photoelectric cell (or photocell) is an electronic device that creates electricity when light hits it. In really basic terms, Semiconductor lasers are super tiny lasers (the laser part being around 2mm square) that create light by bouncing photons back and forth in a tunnel (the Junction) between two semiconductors (the -ve and +ve terminals), and sending those photons through a polished lens. The lens is parallel to the Junction at the end of the laser and creates the light that goes on to read the CD. The motor makes the disc rotate at high speeds up to 500rpm so that it can be read. The laser and photocell are on a track that moves from the center of the CD to the outside rim, reading the disc. As it reads and gets further to the outside and the number of the track you are on goes up, the motor slows down in speed. The laser will flash up to the shiny aluminum belly of the CD, reading the pits (where nothing is reflected back and the light is "absorbed") and lands (where light is sent back). Every time a land is hit by the laser, the photocell will recognise the light and send a little bursting electric current to a circut that generates a 1. The photocell will also make the circut generate a 0 when it realizes there is no light being reflected. These zeroes and ones are sent from the first circut to a second circut called a DAC (or Digital to Analog Converter) decodes the binary and sends it back into patterns of electric currents. Then, the loudspeakers connected to the CD player (or built into it ex. a boombox) will take that electric current and change the electrical energy into sound energy, which is a whole other can of worms that I will not try to explain right now.
Burning a CD is a really cool process that's way different from CDs that get manufactured and aren't made at home. Burned CDs, also called CD-R (Compact Disc-Recordable) discs, are made with the laser in your disk drive that records data on to the blank disc. Unlike pressed CDs, CD-R discs have a layer of dye in between the layers of polycarbonate and aluminum. The data gets encoded into this layer of photosensitive dye by being "burned": the burner laser creates a tiny black spot that changes how reflective it is, and that black spot will not be picked up when it's read by a player. That black spot, when read again later, is a 0. All of the spots that are not black are 1.
This is just the basics. If you'd like to learn more about CDs and CD players and how all of it works, the books The Compact Disc Handbook by Ken Pohlmann and Compact Disc Technology by Heitaro Nakajima & Hiroshi Ogawa are both cool and interesting books about it, and can both be found on the Internet Archive (click the titles!)
SECTION ONE: ACQUIRING YOUR MP3S FOR BURNING.
PART 1: How to rip MP3s from a preexisting CD.
What you need...
- A computer with a disk drive, or an external disk drive. Literally any drive will work as long as the writing speed is atleast 8-12x, which is a good sweet spot for burning that's not too slow, but doesn't decrease audio quality or have as much of a chance of errors as faster speeds do. Here's a site with more about that if you'd like to learn more.
- A computer that runs Windows 10 or 11. Windows 7 also works with the program we are using, but it'll be slower.
- The MusicBee program installed on said computer.
- The CD disc you want to rip the MP3s from.
- And some patience, sometimes it takes a little bit of time.
What to do...
- Plug in your disk reader (or open your computer's disk drive), and then open MusicBee. Once the program is open, insert your disc into the reader. Once the disc is inserted, your cursor will show a little CD icon beside it. This means the disc is being read by your computer. Usually, when your computer is finished reading the disc, it gives you a notification and plays a little chime.
- Navigate to the Tools dropdown on MusicBee and click "Rip CD."
This will open a popup window with more things to click through.
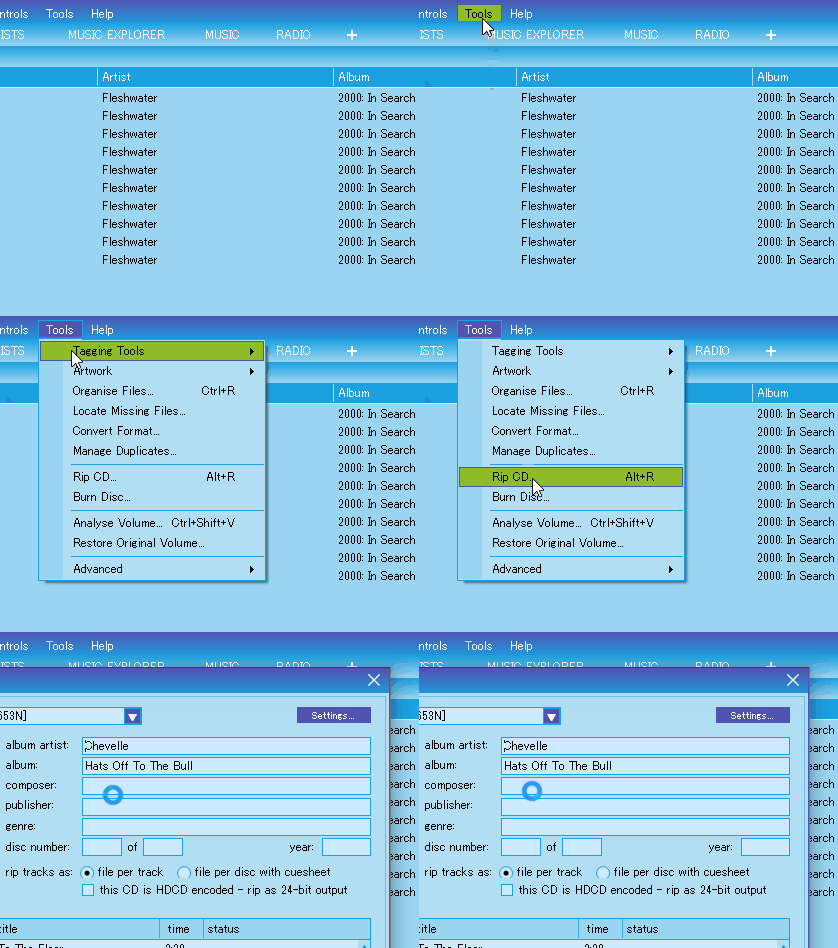
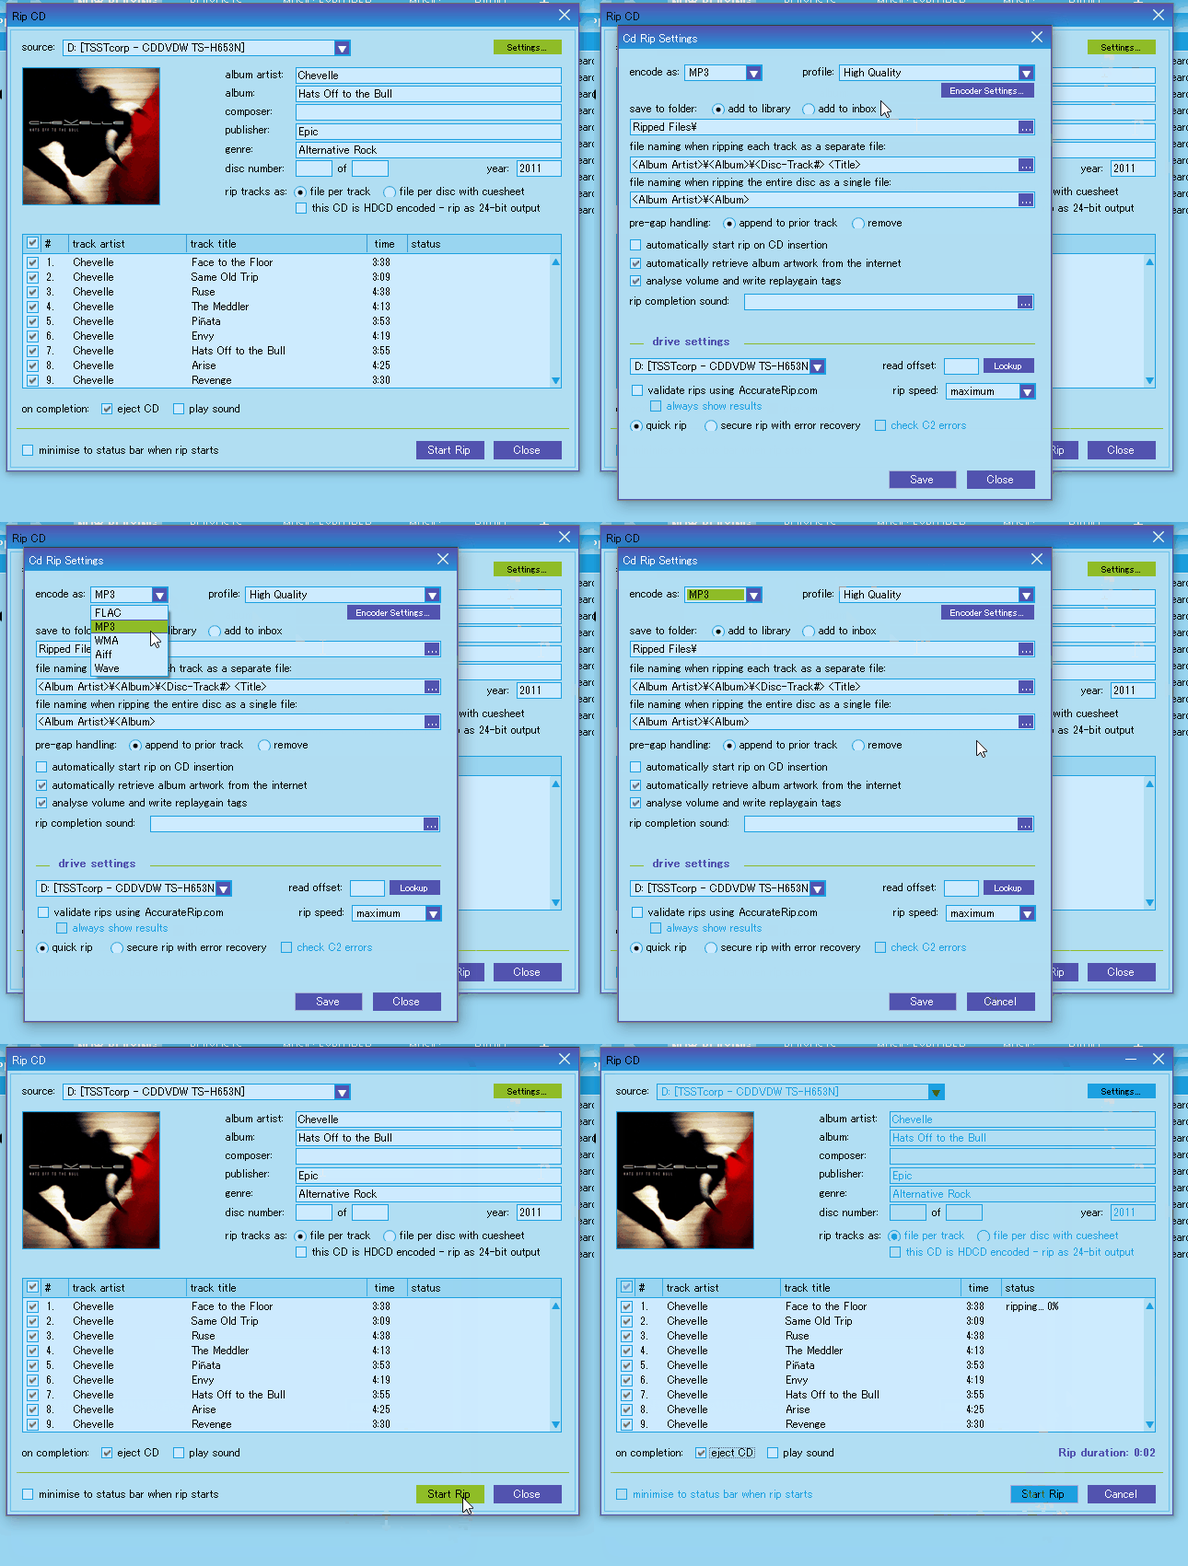
- Once the rip window is open, you can click into the Settings to change things, like the file type or how the file titles will format.
When you're done picking your settings and clicking "Save" to keep them, make sure that the "eject CD" box is checked where it says "On completion."
This makes the whole thing easier when getting your CD out. Once you figure all that out, just click the "Start Rip" button, and watch your computer do its thing.
- MusicBee will give you a time estimate for the rip duration at the bottom of the ripping window.
It's pretty quick most of the time, especially if there's not many tracks.
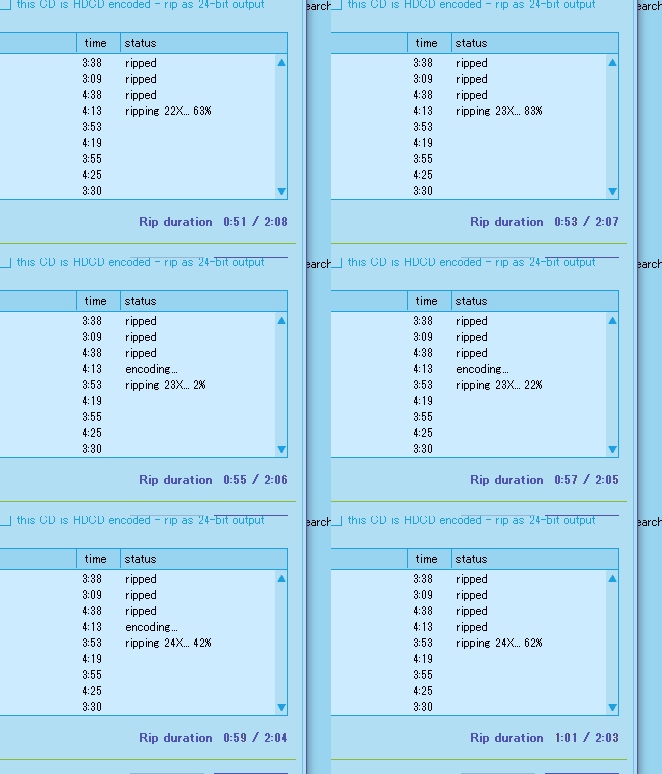
- Once your rip is finished, your CD should eject from your computer or disk drive if you checked the eject box. If it didn't eject, make sure that MusicBee says your rip is completed and double check your library for the files, and then manually eject your disc with the button on your drive.
Tada!!! All done. Now you have the files in your library and they are ready to be listened to. The best thing about MusicBee is that you can find the mp3 files in your file explorer, and then use them elsewhere, such as putting them on an mp3 player or sharing them with people.
PART 2: Other ways to get your own mp3 files.
There are many ways to go about getting your own mp3 files. Here's the main places I get mine.
Soulseek (https://www.slsknet.org/news/)
Soulseek (also called slsk) is a free file sharing network. You share your files to be able to download the files of others. It's spyware free, which rocks. And there's a search engine and chatrooms, which also rocks. It works on Windows, Mac, and Linux. Soulseek is the main place where I get all of my music that I don't own on CD.
Bandcamp (https://bandcamp.com/)
Bandcamp is an online music distributing platform that a lot of artists sell downloads of their music on. If you want to get MP3 files directly from the artists and support them, Bandcamp is a great place to do so. Not everyone sells their MP3 files there, but a good amount of them do, especially smaller artists or more underground ones.
Free Media Heck Yeah (https://fmhy.net/audiopiracyguide)
Specific Useful Sections...
Download Sites
Genre-Specific
FMHY is a really cool and really huge resource list of places to get free media. Not only do they have a music and audio section, they have other forms of media too, like video/film and literature. There's a ton of helpful stuff there, so feel free to dig through it on your own time.
Internet Archive (https://archive.org/details/audio)
Who doesn't love the Internet Archive? They have a ton of stuff on here too. If you like weird music that's obscure or uncommon and also free, check out what they've got on there.
PART 3: How to add your own mp3 files into MusicBee.
Adding your files into MusicBee is super easy.
Here's a gif of what to do, and the steps just for the fun of it.
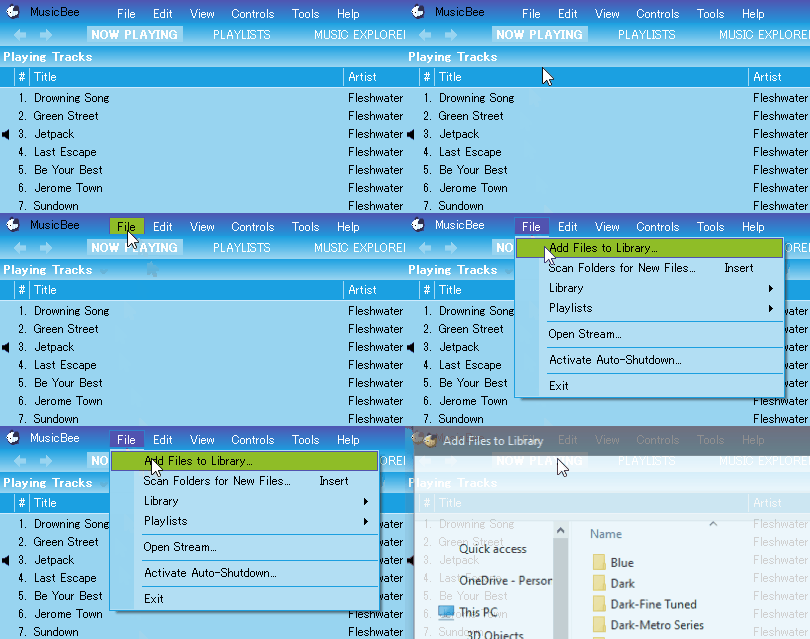
- Open MusicBee and navigate to the File dropdown.
- Select the first option "Add Files to Library."
- Add the files you want into MusicBee.
MusicBee also has the option to scan certain file folders and locations on your computer every time you re-open it. To do this, select the second option "Scan Folders for New Files," and then select the folders you want MusicBee to scan.
SECTION TWO: BURNING YOUR mp3 FILES ON TO A CD.
What you need...
- A computer with a disk drive, or an external disk drive.
- A computer that runs Windows 10 or 11.
- The MusicBee program installed on said computer.
- A blank CD disc. You can buy these pretty much anywhere with different maximum listening minutes and storage capabilities. I honestly get all of mine from the thrift store, because they tend to show up there a lot, even sealed packs of them. Standard storage size is usually 700mb to 800mb of storage, and about 74 to 85 minutes of listening. If you want more storage or listening time, try using a blank DVD to burn instead. They have a larger storage capacity, as they aremeant for video, but can also be used for audio.
- The MP3 files you want to burn on to the CD disc.
- And finally... some patience.
What to do...
- Just like when you rip a CD: plug in your disk reader (if applicable), open MusicBee, and insert a blank disc.
Once the disc is inserted, your cursor will show a little CD icon beside it.
This means the disc is being read by your computer.
Since it's empty, this means the computer is processing how much storage is on it.
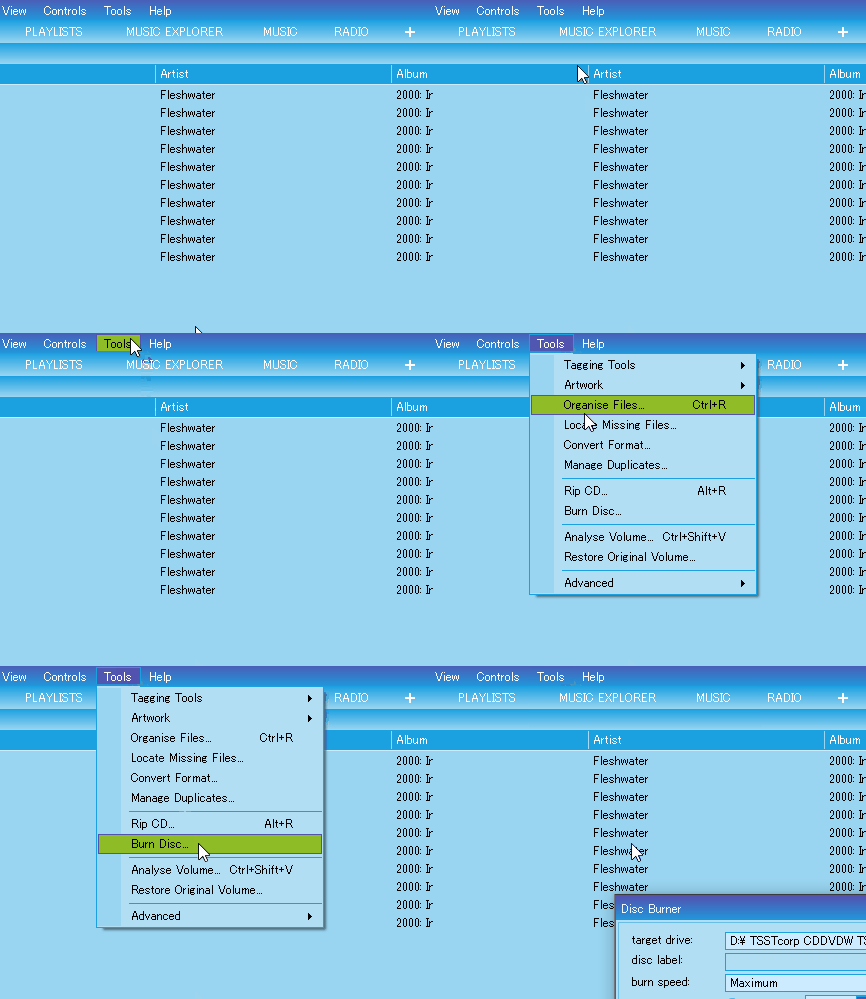
Note... You don't need to put the disc in before you open the program. MusicBee will be able to tell that it's blank. - Navigate to the Tools menu and select the "Burn Disc" option.
It'll bring up a new window where you can pick options and start the burn.
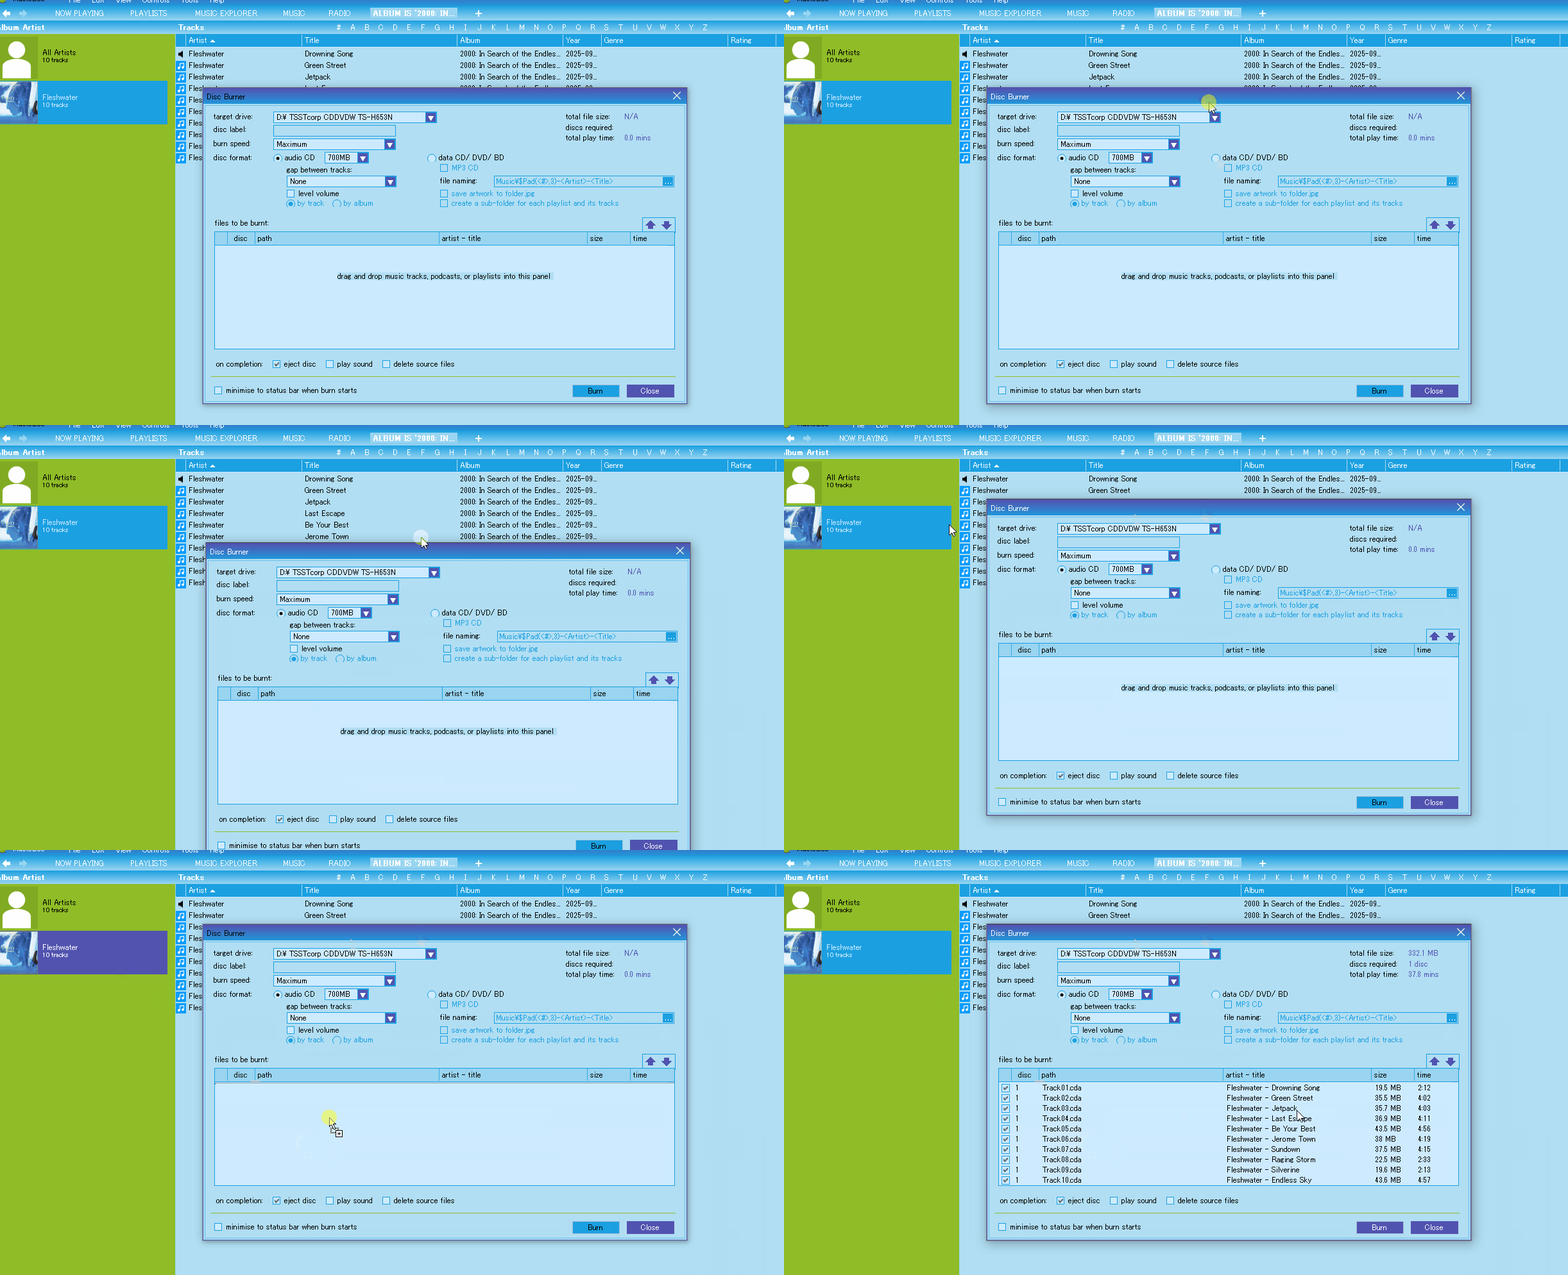
- Once the burn window is open, click and drag the list or album you want to burn on to the CD into the "Files to be burnt" box.
- After the files are in the list, you have to set a few settings.
First, check if your disc format is correct: It should be set as an audio CD, and set to the correct storage size of your CD.
This CD is 700MB, so that's what I pick. Also, make sure to set the burn speed.
A slower burn speed is optimal for CD burning (if the CD is burned super quickly, it could make the CD have uneven dye layer deposition, which sometimes causes playback issues.
Slower burn speed = More consistency in the dye layers.) but for this example I picked Maximum so it wouldn't take as long.
Finally, check the box that says "Eject disc" in the options for "On completion."
Then, click the "Burn" button.
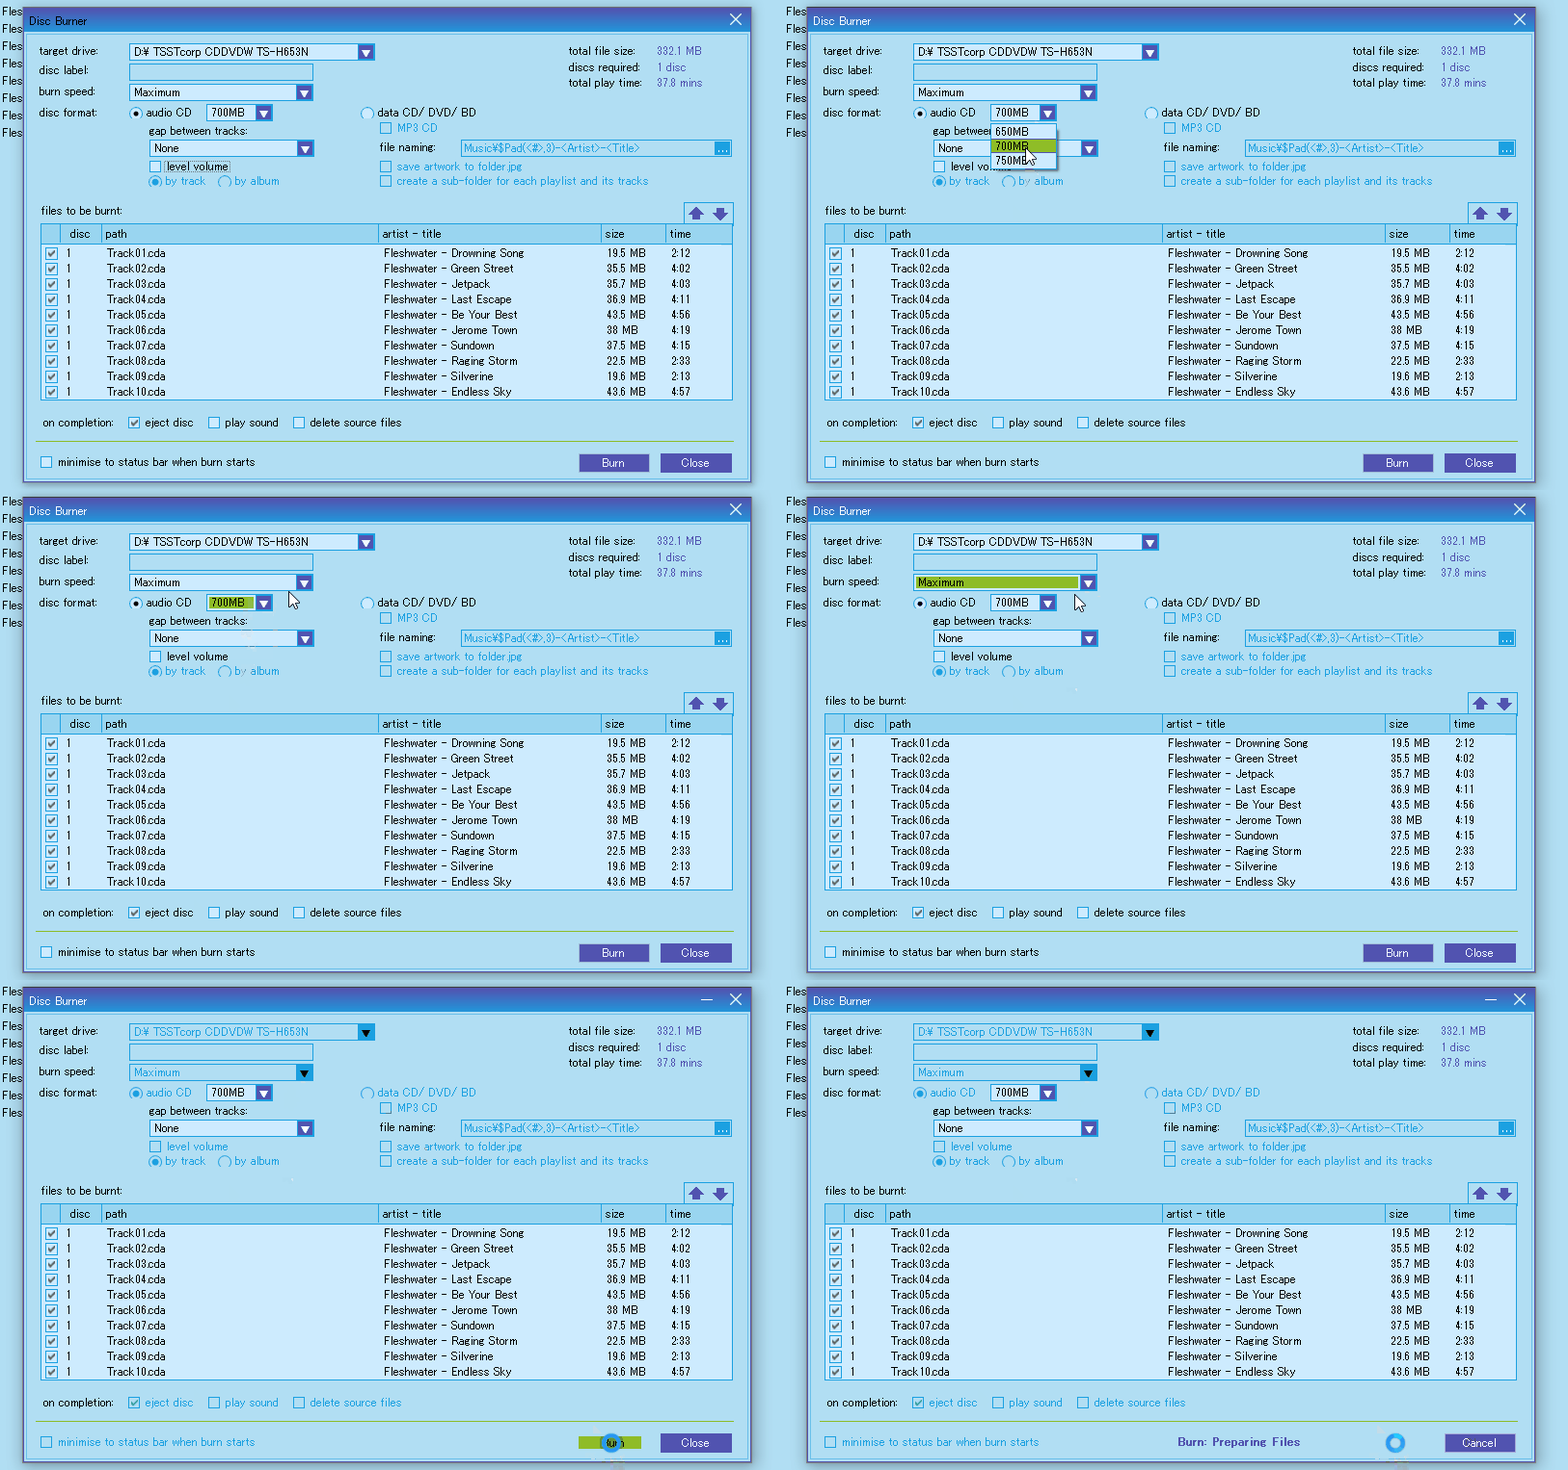
- As the burn commences, there will be a completion percentage at the bottom of the window. Patience is key here.
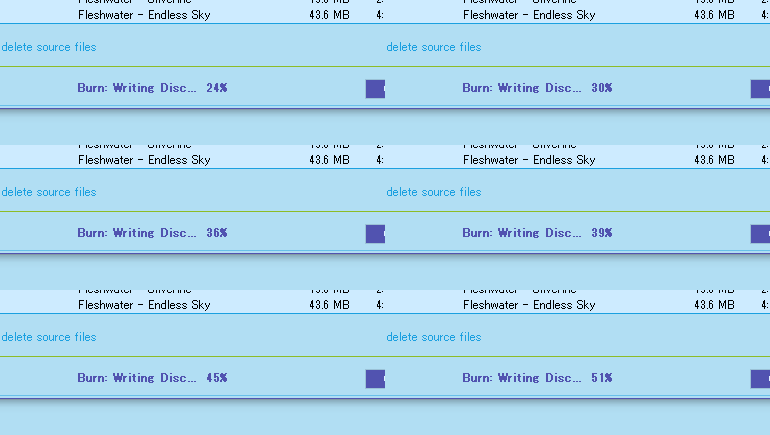
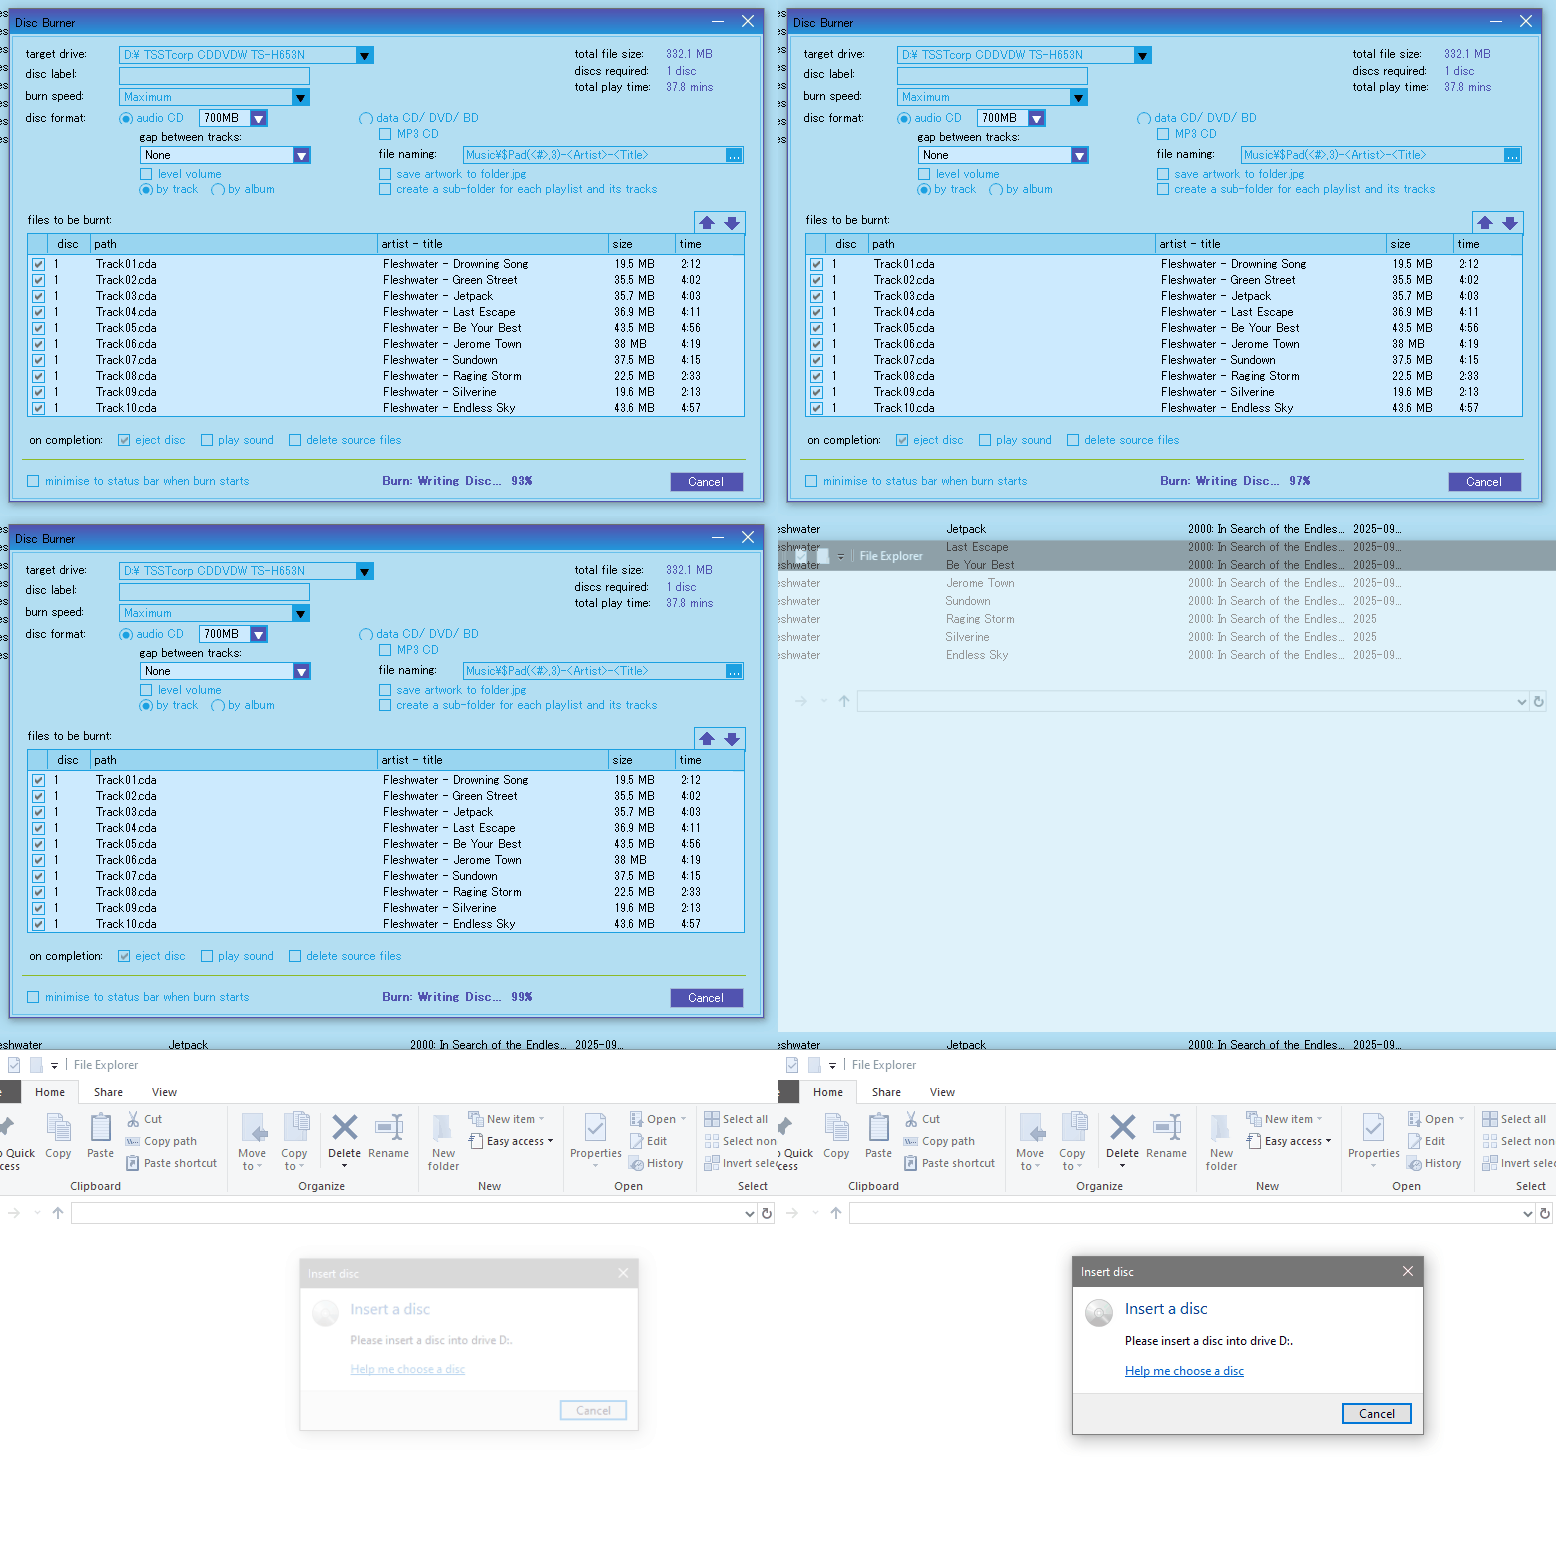
- Once the burn hits 100% completion, your computer should automatically eject your newly burned CD, and MusicBee should close the burning window and give you a notification to insert a new blank disc.
- Congrats, you have a burned CD!! Pop it into your player and listen. Make sure your CD player can play burned CDs. Usually they will be able to, especially since we burned this CD as an Audio CD. Sometimes older players cannot play burned CDs, but it's only really when the disc has some sort of problem, or are not burned as Audio CDs.
SECTION THREE: HOW TO TAKE GOOD CARE OF YOUR CDs.
To finish off this guide, I wanted to include tips on how to keep your CDs in good shape so they last a long time. Keeping your CDs clean and storing them well keeps them from getting damaged by being scratched or dirtied, or even having severe things like Disc Rot that will ruin them forever.
- PROPER CD HANDLING... Never touch the shiny underside of your CD. Hold your CDs around their edges like a claw, or by the hole in the center. Do not sit them down on any surface that may scratch the bottom. Sitting your CDs label down may seem like a good idea, but it will honestly just expose the bottom to more possible damage. The best place to sit your CDs is in your player or in their case.
- CLEANING... Clean your discs with a microfiber cloth. I usually use one of the cloth lens cleaners that you get for your glasses. Make sure the cloth stays clean and soft. When you wipe your disc with the cloth, don't just scrub at it, especially not in circles. Wipe it in straight lines coming outwards from the center.
- STORAGE... Jewel cases are the best way to store your discs. In digipak cases, they are way easier to damage. A lot of people store their discs horizontally, including myself sometimes, but CDs are best stored vertically like vinyl, because they can warp over time. Keep your CDs away from heat, direct sunlight, and humidity. CDs are kept the best when they are cool and dry.
- PRESERVATION... Never leave your discs in your player for too long, especially not in your car's CD player. When you're making burned CDs, don't label them with anything adhesive that sticks on to the disc. Using sharp tipped pens or markers to label are also a no-go, as the harsh solvents in the ink could mess up the ink inside the CD.
- SCRATCHES... A lot of people talk about fixing scratches on CDs with toothpaste, but a repair kit is probably your best bet. hat, or buying a motorized disc repairing system, but they're pricey.
BONUS SECTION: USEFUL CD RESOURCES.
I'm not done!! Here's some useful resources for burning and MP3 collecting,and also just cool CD related stuff in general.
TheAudioDB.com (https://www.theaudiodb.com/)
TheAudioDB is a community database of all sorts of music artwork and metadata. It also has a free music API. This is where I get a lot of art for disks, booklet art, jewel case art, and more. It's a really cool site just to know about even if you aren't burning CDs.
AccuRadio (https://www.accuradio.com/)
Nota CD resource by all means, but this website has some super cool radio stations. If you like listening to the radio but want to do so on your computer, AccuRadio is great and it's also free!! They have a lot of cool stations and channels too.
Some of my favorite stations...
Nu-Metal/Post Grunge
Emo
Visual Kei
Radio.garden (https://radio.garden)
Another radio website that's super cool!! It lets you listen to global live radio. So awesome...Also completely free, and it's a passion project which makes it 10 times awesomer.
More resources coming soon...